
Optimize Placement. Improve Performance. Clean Up Your Install.
If you rely on a SmartStick USB radio to power your smart home, placement matters more than you might think. Wireless reliability, range, and consistency are all directly affected by how and where your SmartStick is installed.
The HomeSeer Wall Mount Kit for SmartStick is designed to solve one of the most common (and overlooked) problems in smart home setups: poor radio placement. By elevating your SmartStick away from hub electronics and desk-level clutter, this simple accessory can dramatically improve wireless performance while giving your install a cleaner, more professional look.
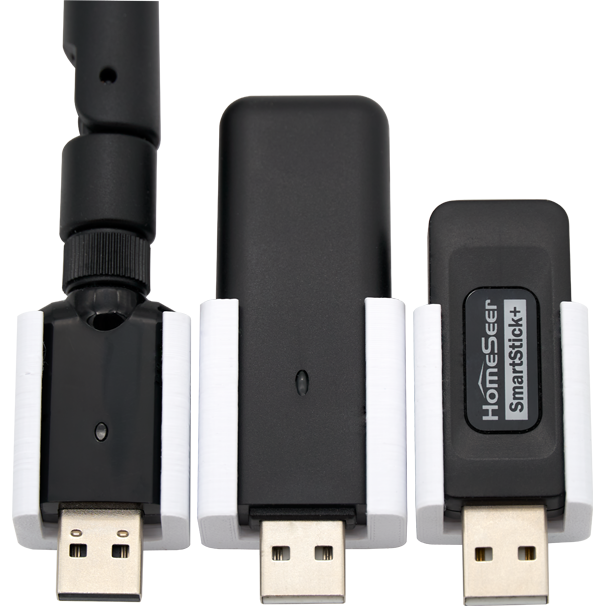
There are 3 types of SmartStick wall mounts (SmartStick G8, SmartStick G3, SmartStick ZB), all with white and black variants. They retail at a cost effective $4.95, and as of 2/6/26 the SmartStick G8 (White and Black) and SmartStick ZB (Black) are currently available for purchase today. The SmartStick ZB (White) and all SmartStick G3’s are available for pre-order.
Why SmartStick Placement Is Critical
Many users plug their SmartStick directly into a hub, mini-PC, or nearby USB port. While convenient, this setup often leads to unintended side effects:
- Reduced wireless range
- RF interference from nearby electronics
- Cable strain and messy installs
- Inconsistent Z-Wave or Zigbee performance
Smart home hubs, power supplies, monitors, and networking gear all emit electrical noise that can interfere with low-power wireless radios. When your SmartStick is buried behind equipment or resting near metal surfaces, its ability to transmit and receive signals is compromised.
Elevate Your SmartStick for Better Performance

Mounting your SmartStick vertically on a wall allows it to operate in a optimal capacity, because it is the orientation it was engineered for.
By moving the radio away from electronics and positioning it in open air, you can:
- Improve signal propagation throughout your home
- Reduce packet loss and communication retries
- Achieve more consistent long-range device connectivity
- Increase overall network stability
The result is a stable, more responsive system with fewer unexplained dropouts.
A Cleaner, More Professional Installation
Beyond performance, the HomeSeer Wall Mount Kit helps clean up your install:
- No more dangling USB sticks
- No cable strain on USB ports
- No cluttered shelves or desks
Whether your hub lives in a structured wiring panel, server rack area, or home office, wall-mounting your SmartStick creates a tidy, intentional setup that looks as good as it performs.
Simple Installation in Minutes
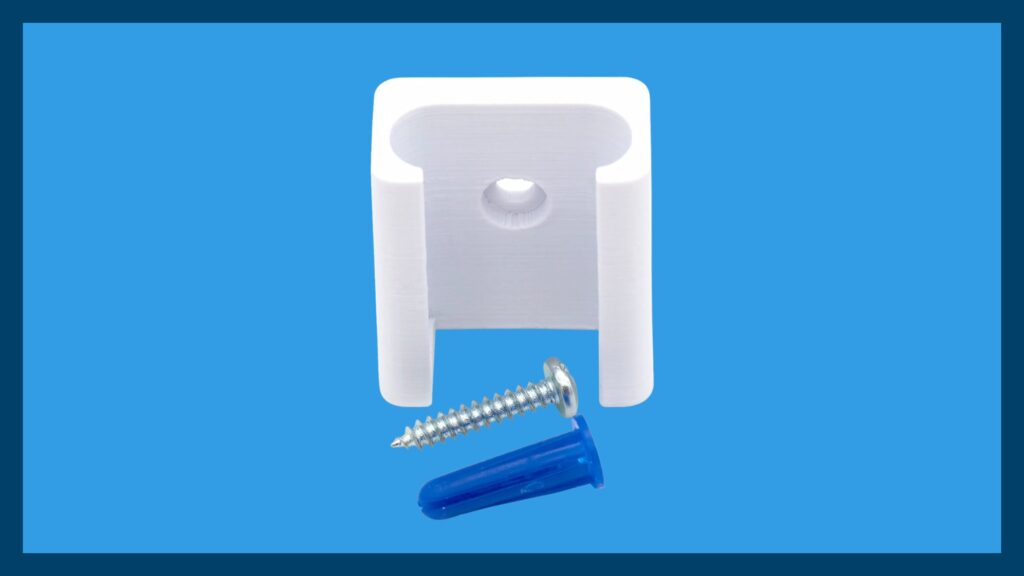
You don’t need special tools or hardware to get started. The mount is designed for quick, straightforward installation:
- Single mounting hole
- Uses a standard #6 pan head screw
- Drywall anchor included for non-stud mounting
- Installs in minutes with basic tools
Just mount the bracket, connect your SmartStick using a USB extension cable, and enjoy improved placement instantly.
Details
In the box
Each kit comes complete with everything you need:
- 1 – 3D-printed wall mount bracket
- 1 – #6 × 3/4″ pan head screw
- 1 – Drywall anchor
What you will need
- SmartStick USB Interface (sold separately)
- USB-A extension cable
Using a short USB extension cable allows optimal positioning and prevents stress on the SmartStick connector.
Documentation
An easy-to-follow Installation Guide is included to ensure a smooth setup from start to finish.


4 thoughts on “Getting the most out of your SmartStick: Wall Mount Release”
Hi Mark, thanks for very valuable advice.
But questions…
A) how far away is “far enough”?
B) USB extension – can it be v2 or must it be USB v3?
USB 2.0 is perfectly fine for this. A 3-foot extension is more than enough to reduce any interference from the hub. In my case, my hub is in a cabinet about a foot from the floor. I installed 6′ extension cables for my SmartStick G8 and ZB… and those are mounted to the wall at roughly eye level.
Where are the STL files? You should let customers with printers print these themselves.
Hi Tom – Agreed! The STL files can be downloaded from our main downloads page.
Comments are closed.